搬运至GitHub,感谢众多大佬和 https://www.fuych.net/
建站容易,优化、维护难,在此立帖为证——把博客、网站优化到满意为止,给自己、喜欢我的博客人一个更好的用户体验,分享中享受生活。
优化的重点在设置缓存、图片优化、利用好CDN
一、LNMP、LAMP环境下安装PHP拓展,优化PHP运行速度
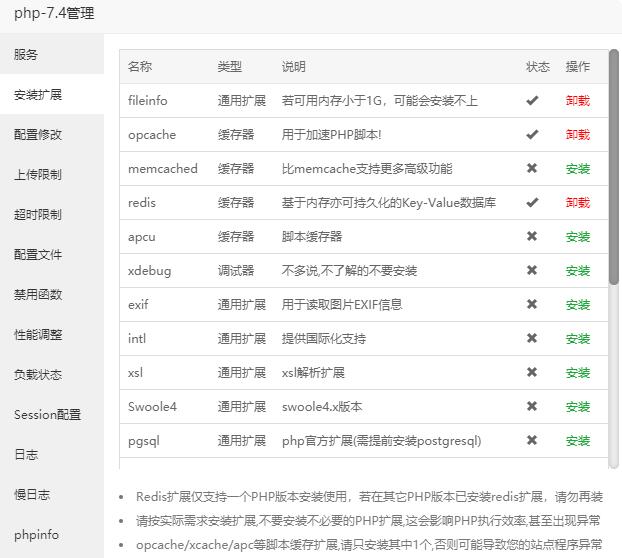
1.宝塔面板中可以很轻松地安装拓展,只需点点小鼠标,装常用的几个就OK了

2. Session配置中选择 mencached或者 Redis(我更喜欢用mencached)
二、WordPress安装缓存插件
1.第一种方法是安装WPJAM插件(扫码开启拓展功能)后,复制插件里面的 object-cache.php 文件到wp-content目录,之后回到WPJAM插件查看系统信息查看是否生效
2.考验动手能力的操作方法来了(我推荐这个)
2.1 上述所说步骤做完之后,编辑博客根目录的wp-config.php 文件,添加下方两段代码进去并保存:
define('ENABLE_CACHE', true);
define('WP_CACHE', true);
2.2 项目来自GitHub https://github.com/tollmanz/wordpress-pecl-memcached-object-cache
翻译一下操作方法是:同样是把 object-cache.php 文件复制到wp-content目录 ,不一样的是不用安装插件,直接复制 : global ******* )); 这段代码 在wp-config.php文件中 。然后自己测试下效果,GitHub页中有测试方法
Now that the server dependencies are resolved, the rest of the configuration is in the WordPress application. Take the object-cache.php file and place it in your wp-content folder. For instance, if the root of your WordPress installation is at /srv/www/wordpress, the location of object-cache.php would be /srv/www/wordpress/wp-content/object-cache.php. Please note that object-cache.php is a WordPress drop-in. It is not a regular plugin or an MU plugin. Drop-ins are located directly in the wp-content folder.
Add the following to your wp-config.php file:
/** 设置缓存。 */
 global $memcached_servers;
 $memcached_servers = array(
     array(
         '127.0.0.1', // Memcached server IP address
         11211        // Memcached server port
     )
 );
 define('ENABLE_CACHE', true);
 define('WP_CACHE', true);
 /** 多站点 Memcached冲突解决办法 。 */
 define('WP_CACHE_KEY_SALT', 'www.hezhijun.com');
3.网上其它类似的方法很多,大家可以自己去尝试下
温馨提示下:如果遇到打开网站之后发现页面是空白的?请重启服务器相关环境
三、 Rocket-Nginx (设置Nginx缓存)
项目同样来自GitHub https://github.com/SatelliteWP/rocket-nginx
1.利用Nginx的缓存和wp-rocket插件结合起来使用 https://docs.wp-rocket.me/article/37-nginx-configuration-for-wp-rocket
2.这里需要注意的是需要设置linux cron定时任务 在cron文件中添加GitHub上定时任务代码即可
# crontab -e 编辑定时任务(centos7)
每15分钟手动执行一次cron作业(对于大多数网站而言,该作业就足够了):

*/15 * * * * wget -q -O - http://www.website.com/wp-cron.php?doing_wp_cron &>/dev/null
3.根据GitHub上的教程直接编译(这里需要注意的是宝塔面板的Nginx目录在/www/server/nginx/)
cd  /www/server/nginx/
git clone https://github.com/satellitewp/rocket-nginx.git
cd rocket-nginx
cp rocket-nginx.ini.disabled rocket-nginx.ini
php rocket-parser.php
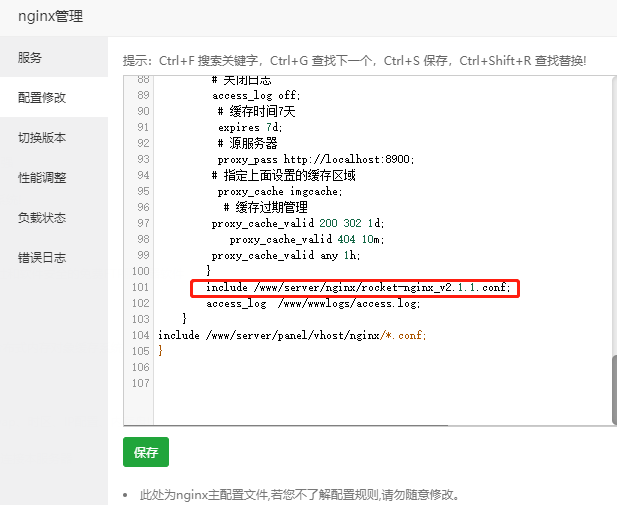
这里可以直接利用GitHub上的教程编译好对应文件,放入服务器中,然后在Nginx中添加 引用(添加红色框内部分代码),不同的Nginx版本可能会有报错,我这里用到是Nginx1.16.1
4.编译完 引用这个.conf文件

最后记得执行 service nginx reload 等命令重启Nginx 和PHP
四、 WordPress的Gravatar头像图片缓存到本地
来自 http://ztmao.com/wpjy/5208.html,因为 Gravatar头像服务器可能经常被墙而导致网站加载用户头像缓慢或者异常,所以需要我们通过某些办法把 Gravatar头像图片缓存到本地服务器。
1. 先在网站的根目录新建一个avatar 的文件夹,读写权限设置为755。
2.将一张default.jpg 的图片作为默认头像放在avatar文件夹中。
3. 打开你的主题的 functions.php 文件,编辑内容。 把下面的代码放入,保存后测试效果
 function my_avatar($avatar) {
$tmp = strpos($avatar, 'http');
$g = substr($avatar, $tmp, strpos($avatar, "'", $tmp) - $tmp);
$tmp = strpos($g, 'avatar/') + 7;
$f = substr($g, $tmp, strpos($g, "?", $tmp) - $tmp);
$w = get_bloginfo('wpurl');
$e = ABSPATH .'avatar/'. $f .'.jpg';
$t = 1209600; //設定14天, 單位:秒
if ( !is_file($e) || (time() - filemtime($e)) > $t ) { //當頭像不存在或文件超過14天才更新
copy(htmlspecialchars_decode($g), $e);
} else $avatar = strtr($avatar, array($g => $w.'/avatar/'.$f.'.jpg'));
if (filesize($e) < 500) copy($w.'/avatar/default.jpg', $e);
return $avatar;
}
add_filter('get_avatar', 'my_avatar');


